I am finally getting around to posting the very last in my series of Fall Sewing posts – a Hollyburn skirt that I finished just before the official end of Fall and beginning of Winter. After my hopes of making a Colette Beignet skirt in blue corduroy fell through, I decided to make this Hollyburn instead.


Ok, I must admit that this pattern is way easier than the Beignet pattern …quick rundown: Beignet is fully lined, fitted, and has 12 buttons down the front; Hollyburn is unlined, fitted only at the waist, and no buttons (but one zipper). I made the view B length (medium length), with the button tabs. It’s a straightforward pattern with nice simple, clear instructions. And that’s why I managed to finish it so quickly.
But hey, I’m not too proud to enjoy an easy make! I really like this skirt. It has a great shape, and I like the amount of fullness. And I love this fabric!

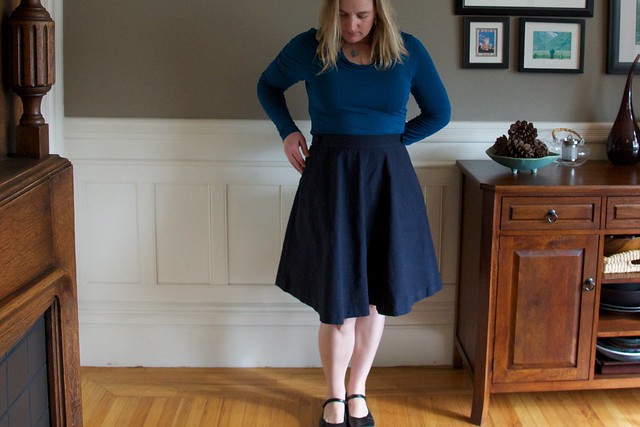
I found a Hollyburn sew-a-long online (here), but honestly didn’t really need it. I did consult it for a bit of help adjusting the waistband, but that’s about it. After comparing my measurements with the pattern guidelines, I found that my waist measurement (which is what really matters for this skirt) was larger than the largest size. I decided to add 2 inches to the waist – basically grading up a size – to make sure that it fit well (even after a large meal, ha!). However, when I had it all finished up and checked the fit before sewing in the zip, I discovered that it was too big at the waist, by about 2 inches! I took in as much as I reasonably could at the center back seam (about 3/4 inch). So the skirt sits on my hips instead of at my waist. I’m totally fine with that. Here I am holding it up at my waist:
My biggest accomplishment with this project was to get over my fear of hand sewing. I hand-basted the zipper in (then machine-sewed it), and I swear that I will do this from now on! It was super fast and easy and I didn’t have nearly as much trouble with shifting as I do when machine-basting zippers. Success #1! Next, the pattern calls for slip-stitching the top of the zipper to the waistband. I’ve had some poor slip-stitching results in the past so I was a bit nervous, but this time it went smoothly and the stitching seems quite secure. Success #2! Feeling confident by now, I decided to hand stitch the entire waistband down instead of machine topstitching it – a decision based in no small part upon the fact that it was really cold in my basement where my sewing machine was and really warm sitting by the fire in the living room! With hot cocoa! I enjoyed relaxing by the fire with my stitching. Success #3!
I think I need to add some sort of fastener to the top of the zipper. The pattern doesn’t call for one, but somehow the top of my zipper didn’t line up to the top of the waistband.

See that gap? Not sure how that happened, but I think a little hook and eye or even a button with a little loop of cording would fix it.
Overall, I am quite happy with my skirt. It is super comfortable and practical (pockets!). I wore it on Christmas Day with a pair of tights and my mary janes. I think it looks sweet with the mary janes, but would also look nice with sandals in the summertime, or even a pair of boots in the winter. If I make this skirt again I will definitely sew a straight size 16. I also think it might look nice with a wider waistband, so I may give that a try. This seems like a very versatile pattern – simple enough in design, but change up the fabric and it would look like a completely different skirt!

Coming soon: Winter Sewing Plans!
DETAILS
Pattern: Sewaholic Hollyburn skirt, view B length with button tabs.
Size: 16, with 2″ added to waist (but I would make a straight 16 next time).
Fabric: medium weight cotton with bits of colored thread running through, from Fabric Outlet in SF.

Nice! I was taught to always put a hook and eye catch at the top of a zipper. Old school.
LikeLike
Yeah, that’s probably the best way to do it – I don’t think it will be too hard to add in. Just have to go buy some:)
LikeLike