
I recently made a pair of laminated cotton curtains for my son’s preschool, and thought I’d share the process here. The classroom has a couple of sinks with open shelving underneath, previously covered by a pair of well-worn, paint-splattered, curtains. The teacher requested something that would stand up to the usual preschool messes of paint and play-doh:)
Our first thought was to use oilcloth, which would be easy to wipe off, but after a bit of searching online I came across the warnings about unhealthy levels of phthalates present in oilcloth. Oilcloth is essentially vinyl (or PVC) – phthalates are used to soften the PVC so that it is flexible. When shopping online for oilcloth or laminated cotton, you may see statements about whether the product is ‘CPSIA compliant’. CPSIA is a U.S. regulation primarily regulating chemicals (namely phthalates and lead) in children’s products. Needless to say, I decided against using oilcloth in a classroom full of 2-3 year-olds!
Luckily, there are other options…enter laminated cotton! Laminated cotton has the advantage of not only being safe for children’s products, but also is less stiff, so it is overall easier to work with (drapes better, easier to sew, you can iron it,…). Modern June has a nice summary of oilcloth vs laminated cotton, plus tips for sewing, projects, etc. I wanted a print that wouldn’t show dirt/paint messes, so I choose this floral print with a brown background which I found online. I have to say that it’s not my favorite print and I probably would have gotten something else if I’d seen it in person, but I think it works just fine for the purpose.
The first step was to measure the openings and do some Curtain Math*. My openings measured 41″ wide x 19″ high and 44″ wide x 32″ high. My laminated cotton was 42″ wide, so I decided to make 2 panels for each opening using the full width of the fabric (this gives it close to double fullness). Add 5″ to the top and 2″ to the bottom for hems. That gives me lengths of 26″ and 39″ (remember I’m not trimming the width here because it was just about right).
*please google ‘curtain math’ – it just may make you giggle:)
I left the selvage on and used that as a 1/2″ guide for sewing the edges – folded the edges over twice, pressed them with a low-heat iron and pressing cloth, and sewed them – didn’t even use any pins.
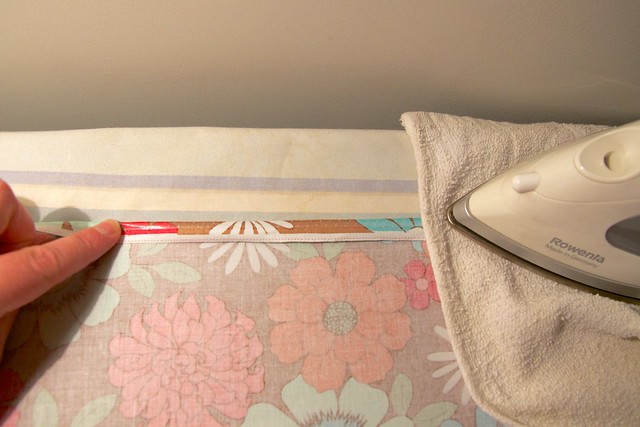
The teflon foot that came with my machine worked great for this. Hem tape would have made this even easier, but I didn’t have any.

For the top hem/pocket I folded the over edge 1/2″, then another 4.5″ and sewed them at the bottom edge. At this point I double checked the curtain length by doing a test-hang just in case I measured wrong the first time, then hemmed the bottoms.
I decided that I wanted to make these a grommet-top style curtain. Why? Because
(1) I wanted them to hang in a nice even wave, (2) wanted them to slide easily (clip on rings would accomplish this too), (3) wanted the fuller coverage (at the top) provided by grommets (vs clips), and (4) it sounded like a fun thing to try:)
The tricky part with grommets is that you’ve got to measure and plan out the spacing JUST RIGHT. There are no second chances once you’ve cut giant holes into the tops of your curtains. 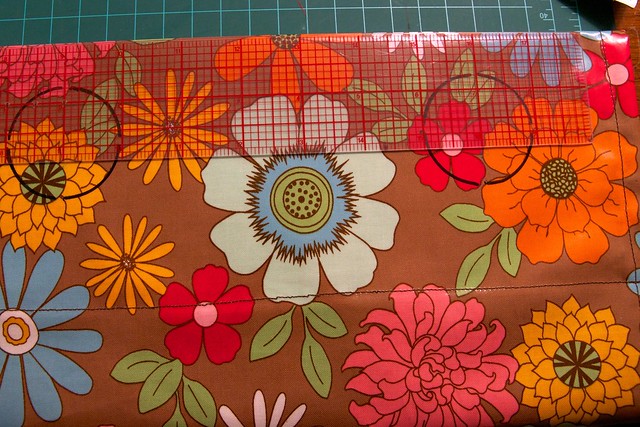
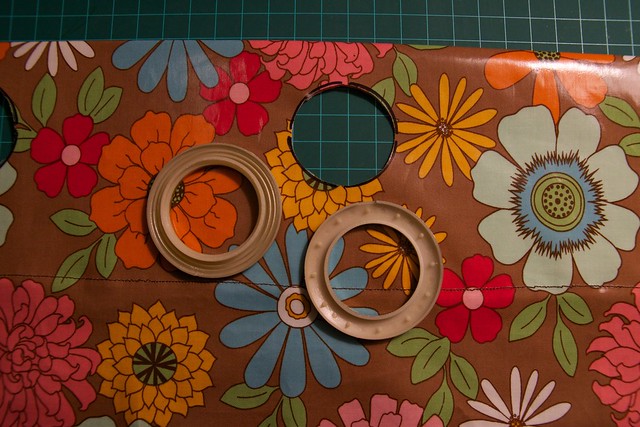
I used 6 grommets for each panel (always use an even number), spaced about 7 inches apart. The two end grommets were about 2.5 inches from the edge of the curtain. The plastic grommets were super easy to install – they just snap together.
These were really easy to make and so far they seem to be serving their purpose well in the classroom. Sewing with laminated cotton was fun and I’ve seen some really cool prints out there – I bet you could make some really cute and fun lunch bags, cosmetic bags, and the like with it!
Details
Fabric: Riley Blake ‘Flower Patch’ laminated cotton
Grommets: Dritz 1-9/16″ (inner diameter) curtain grommets in champagne

One thought on “Laminated Cotton Curtains”